

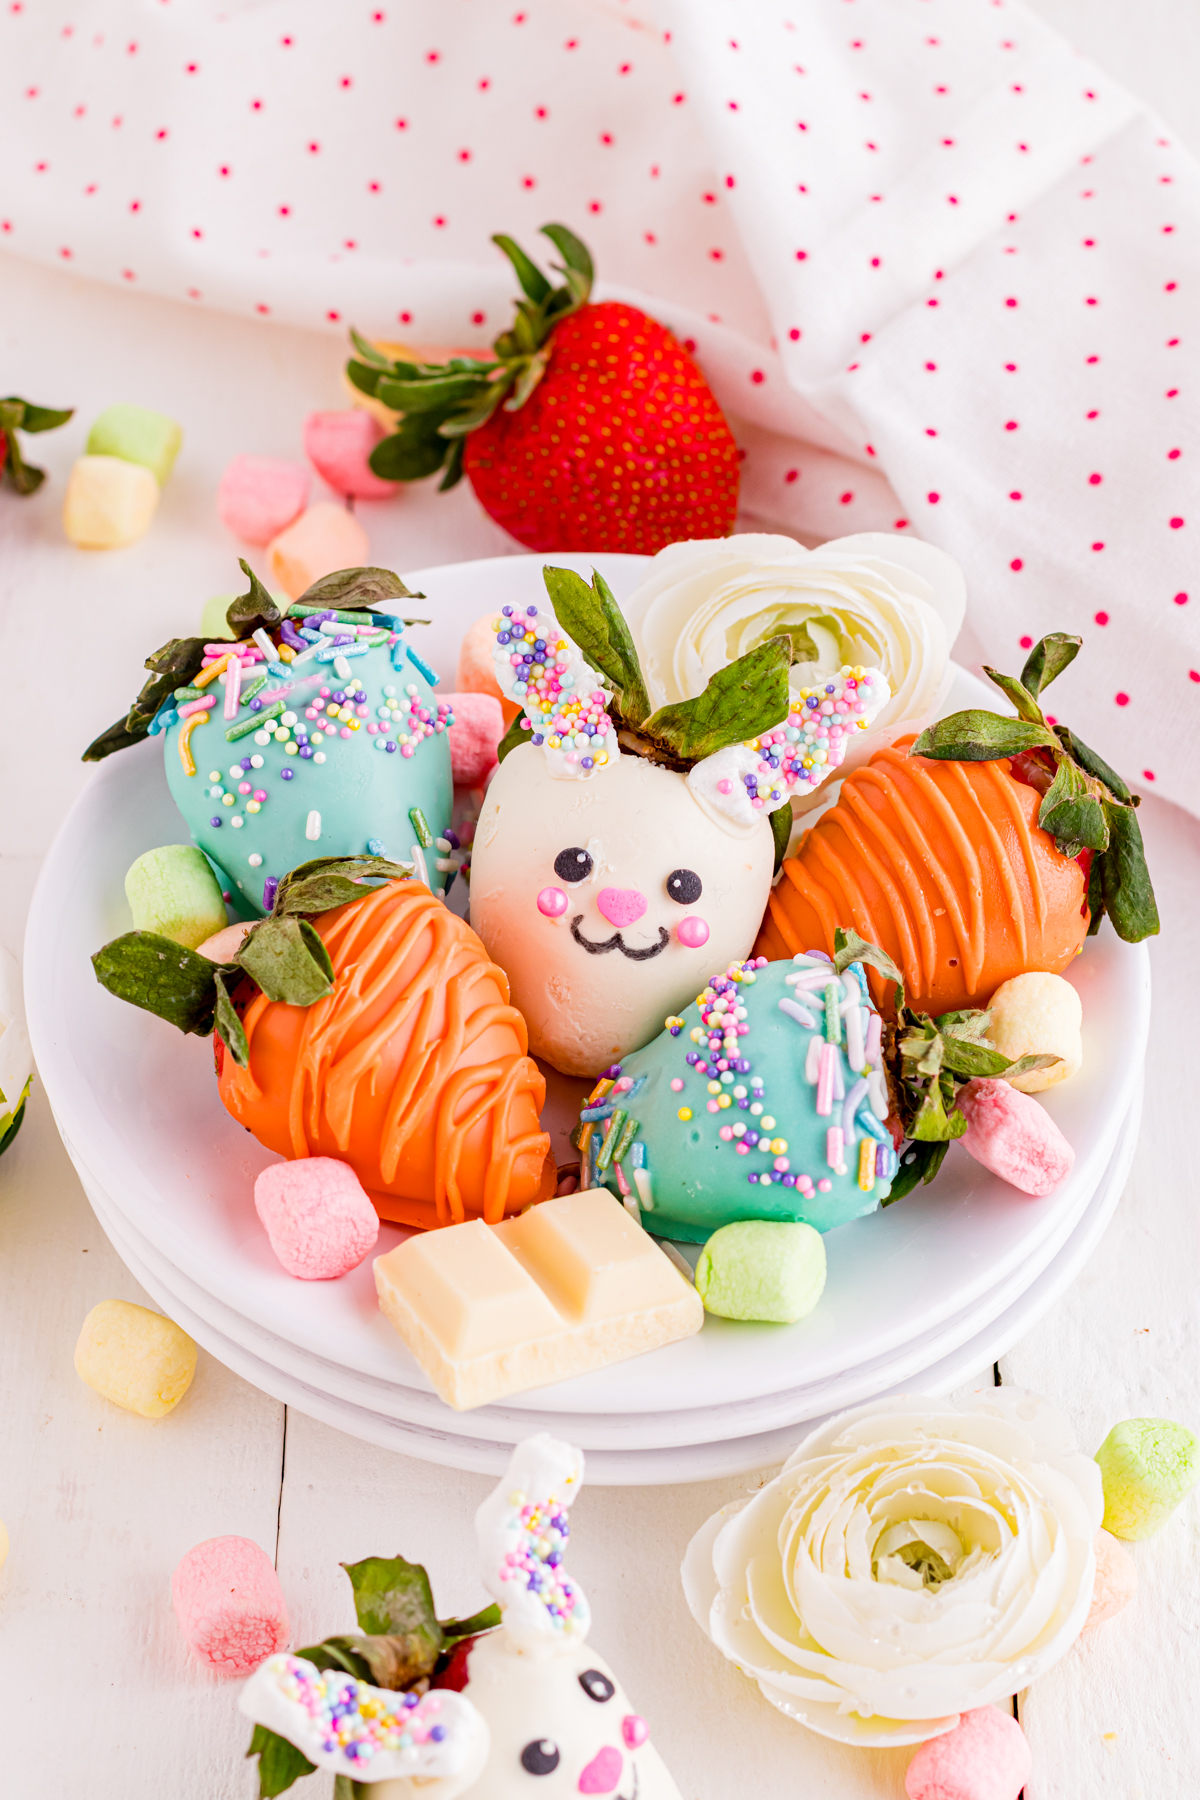
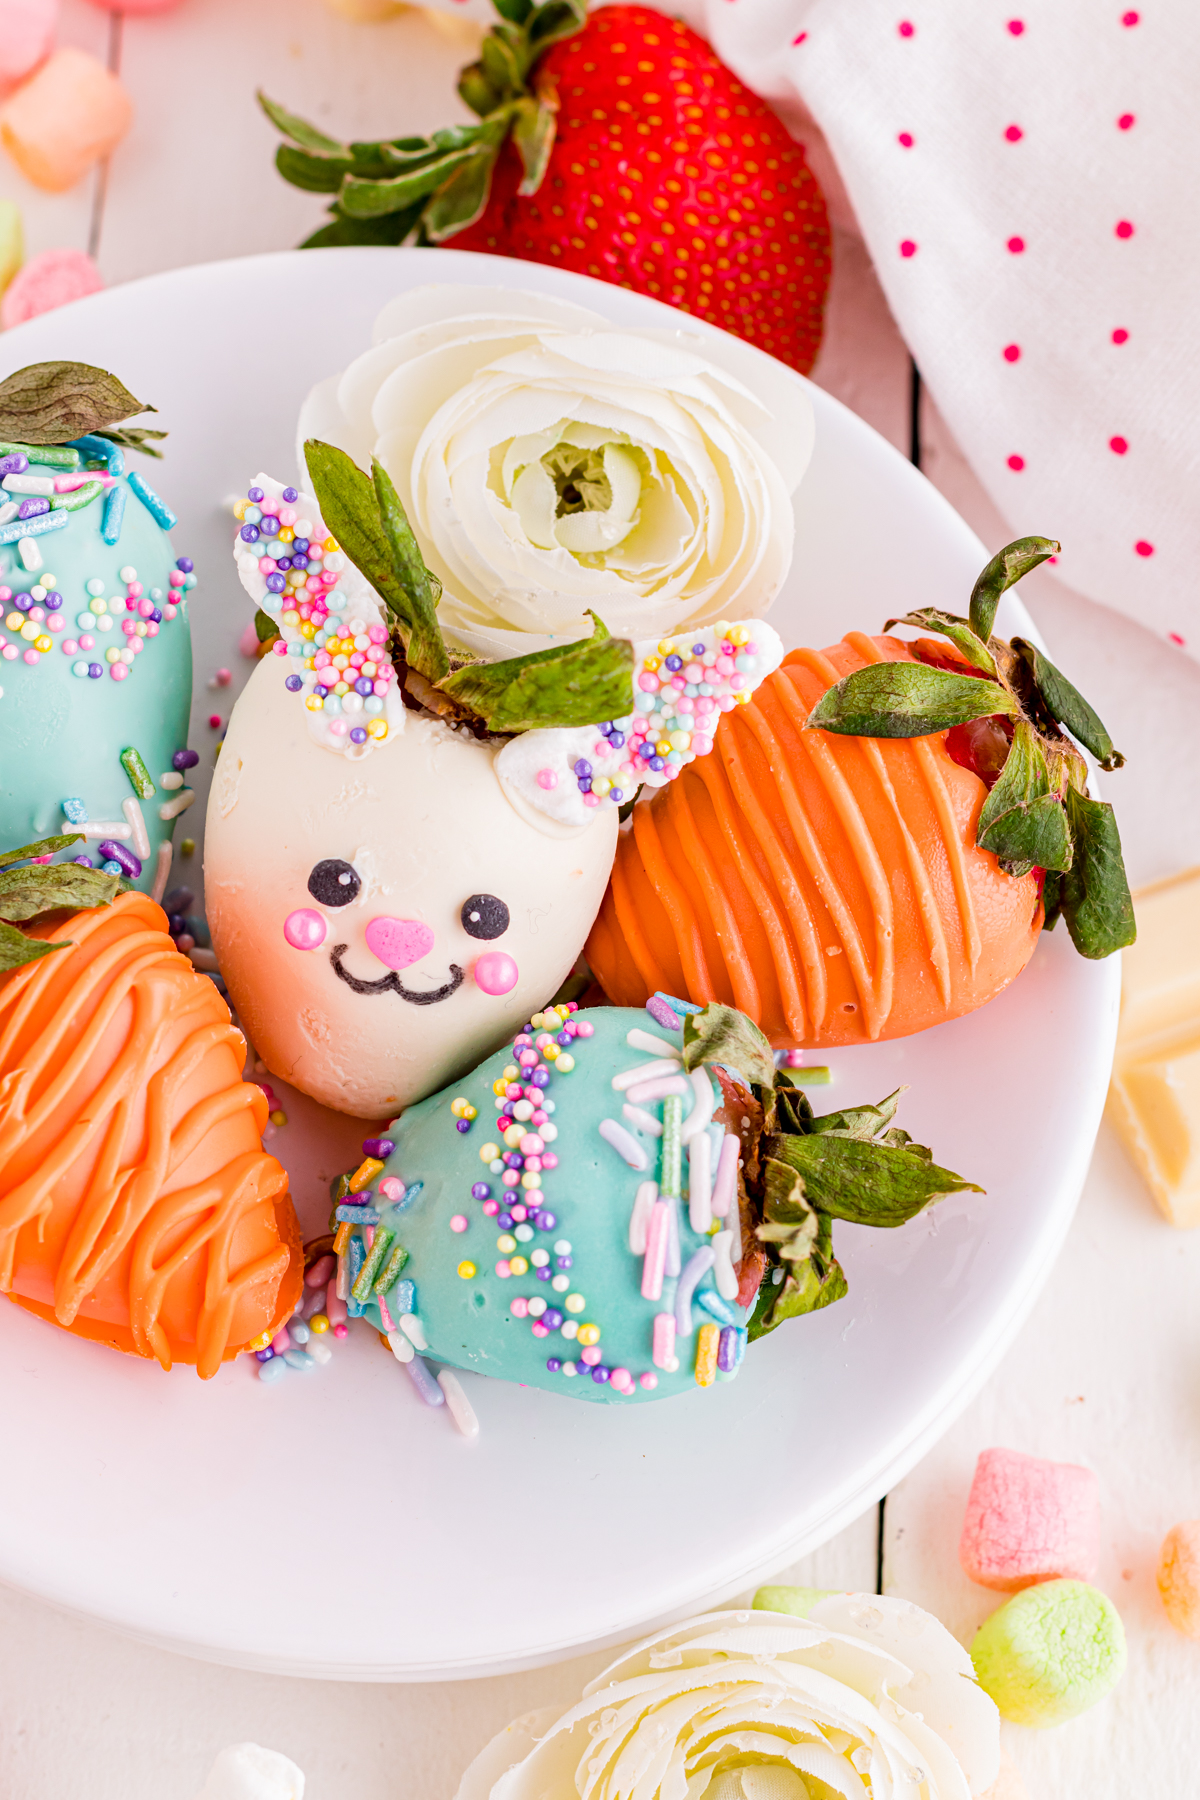
These Easter Chocolate Covered Strawberries are delicious! A cute Easter Bunny, Egg, and Carrot will make Easter tables extra festive!
For holidays I love making fun treats with my boys like these Easter Chocolate Strawberries and our Bunny Cake Pops! We love gifting Easter desserts to friends and family it's a fun way to get us in the spirit of the holidays!
Jump to:
Why You'll Love This Recipe for Easter Chocolate-Covered Strawberries!
These Easter Strawberries:
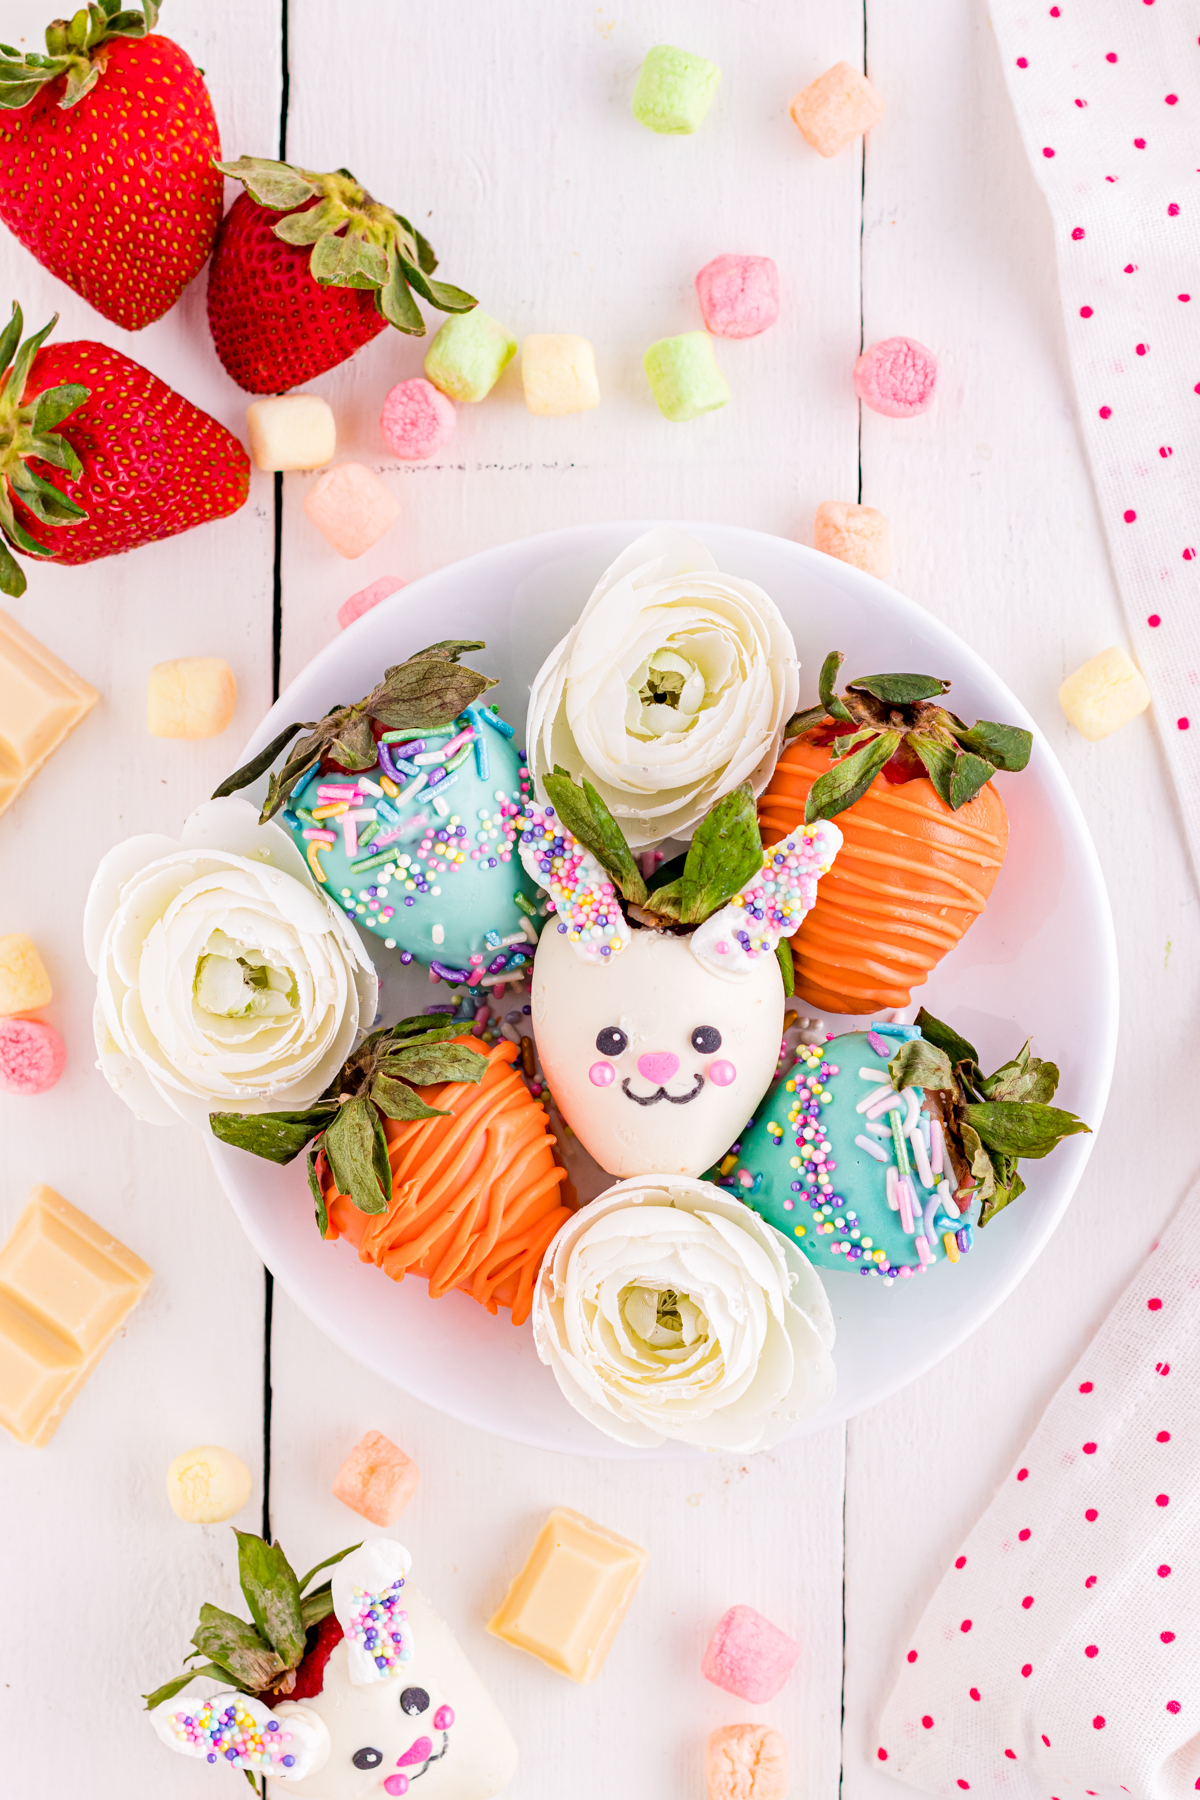
- Make a beautiful centerpiece for your Easter table! Arrange them on a charcuterie board with more fresh fruits, other homemade Easter treats, chocolate eggs, and more Easter themed chocolate.
- A creative and cute treat and the perfect gift for friends and family to share at Easter gatherings.
- Make a fun activity to do with kids and spend fun family time together!
Ingredient Notes
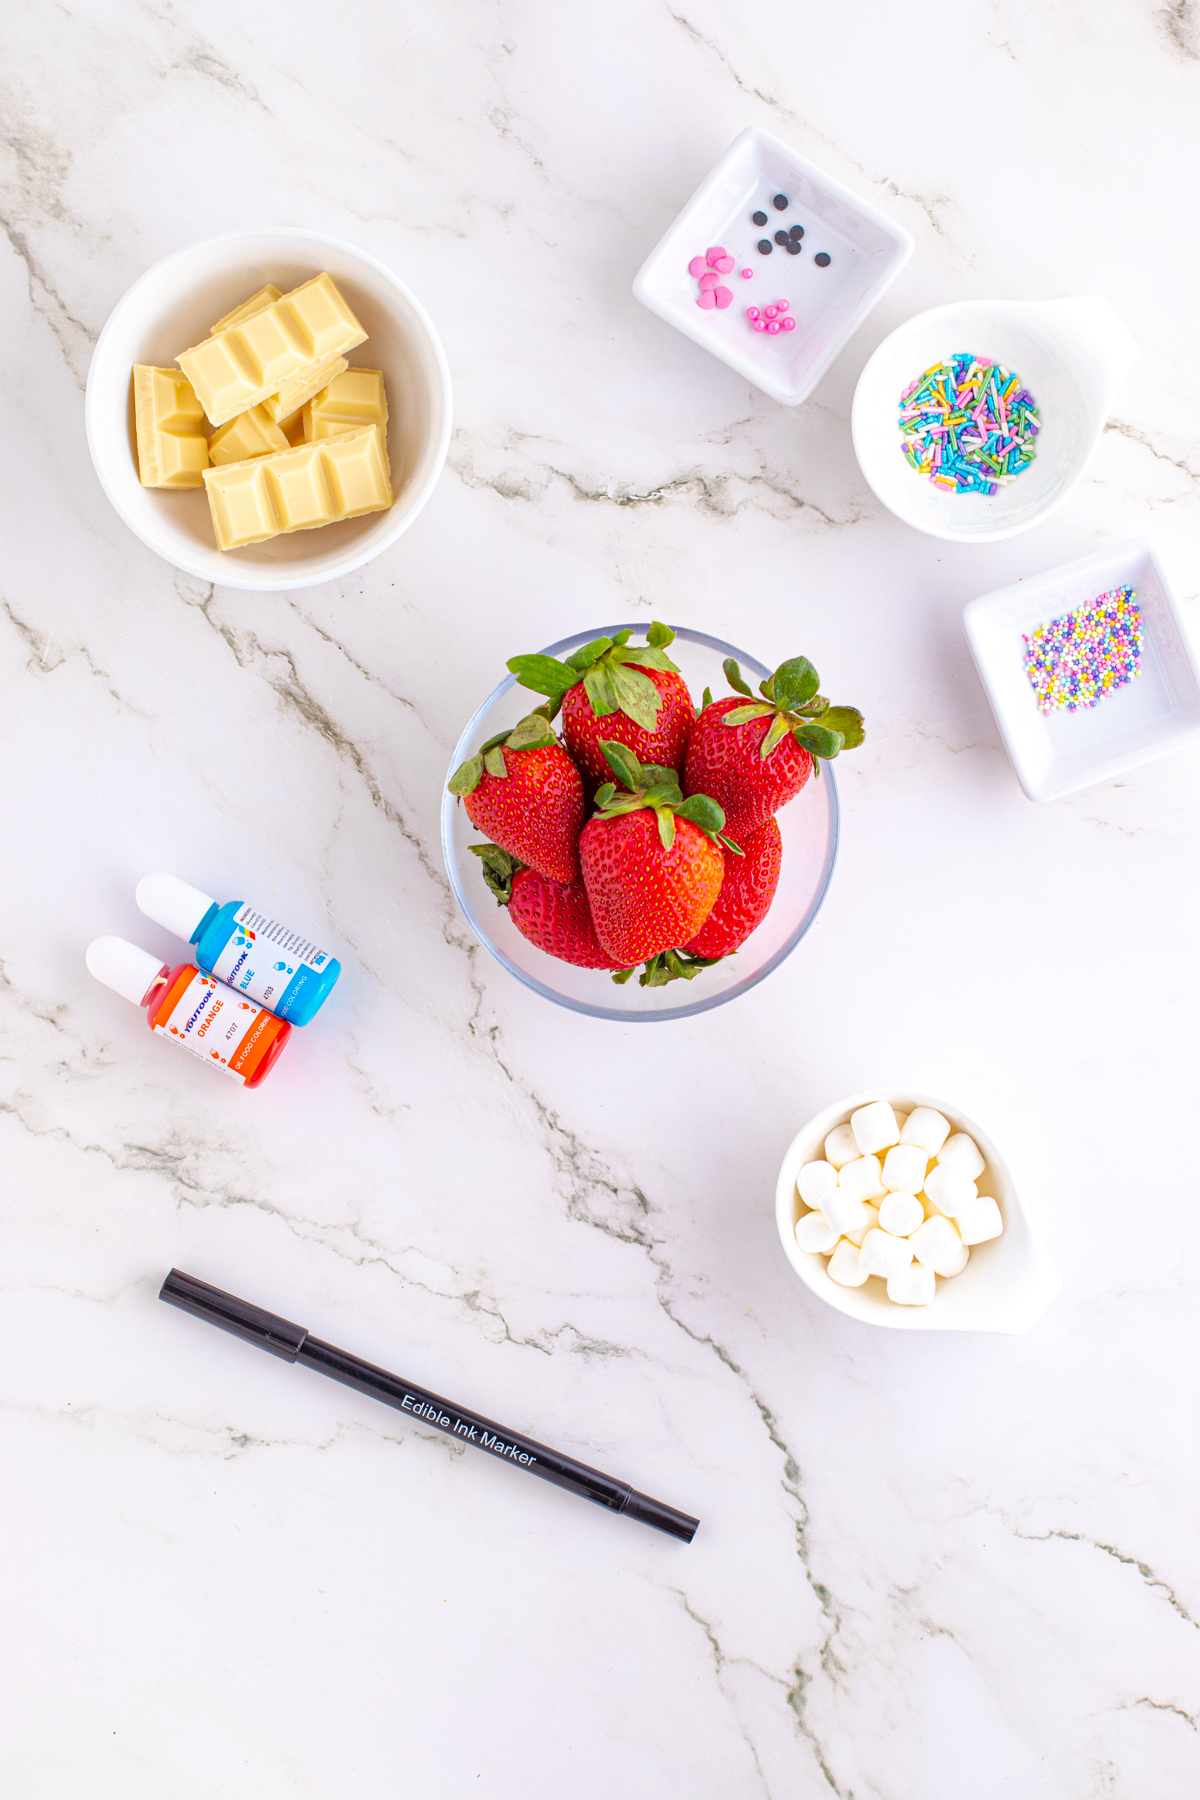
- Fresh Juicy Strawberries- choose larger strawberries to have lots of room for decorating. Be sure to wash strawberries and dry them thoroughly with paper towel before you dip strawberries.
- Belgian White Chocolate - I love Belgian Chocolate, feel free to use white, blue and orange candy melts if you prefer.
- Candy Color - be sure to use an oil-based candy color for the best color coverage.
- Assorted Sprinkles - different sprinkles help to bring the Easter Bunny to life, they form his eyes, and nose, and decorate his ears.
- Mini Marshmallows - mini cut marshmallows create the bunny's ears.
- Black edible food marker- perfect to draw little details like the bunny's mouth.
How to Make the Cutest Easter Chocolate Covered Strawberries!
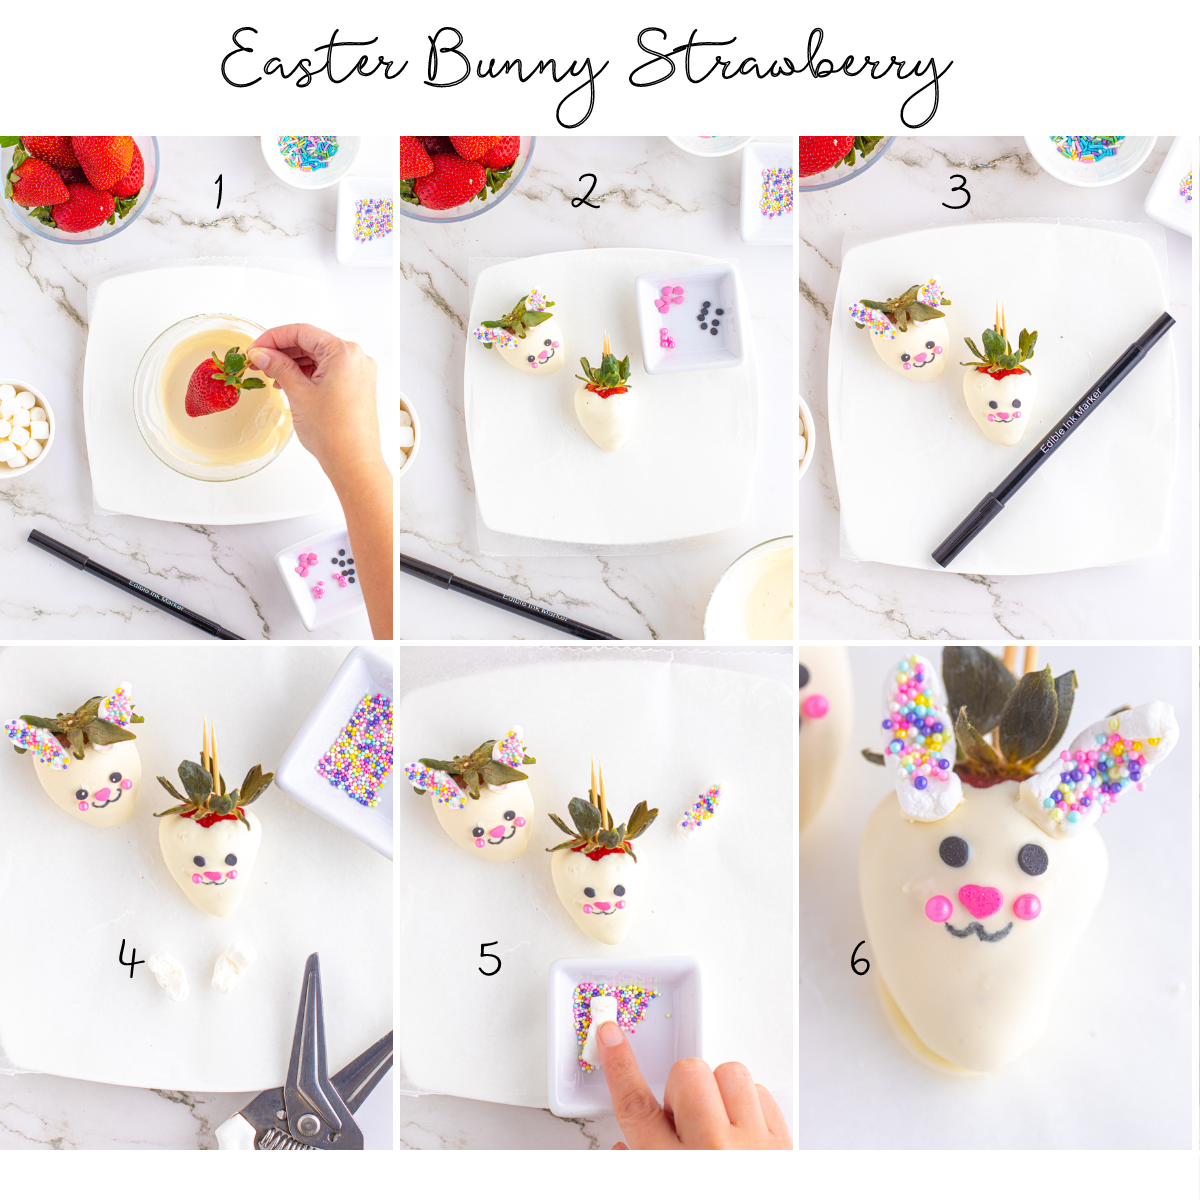
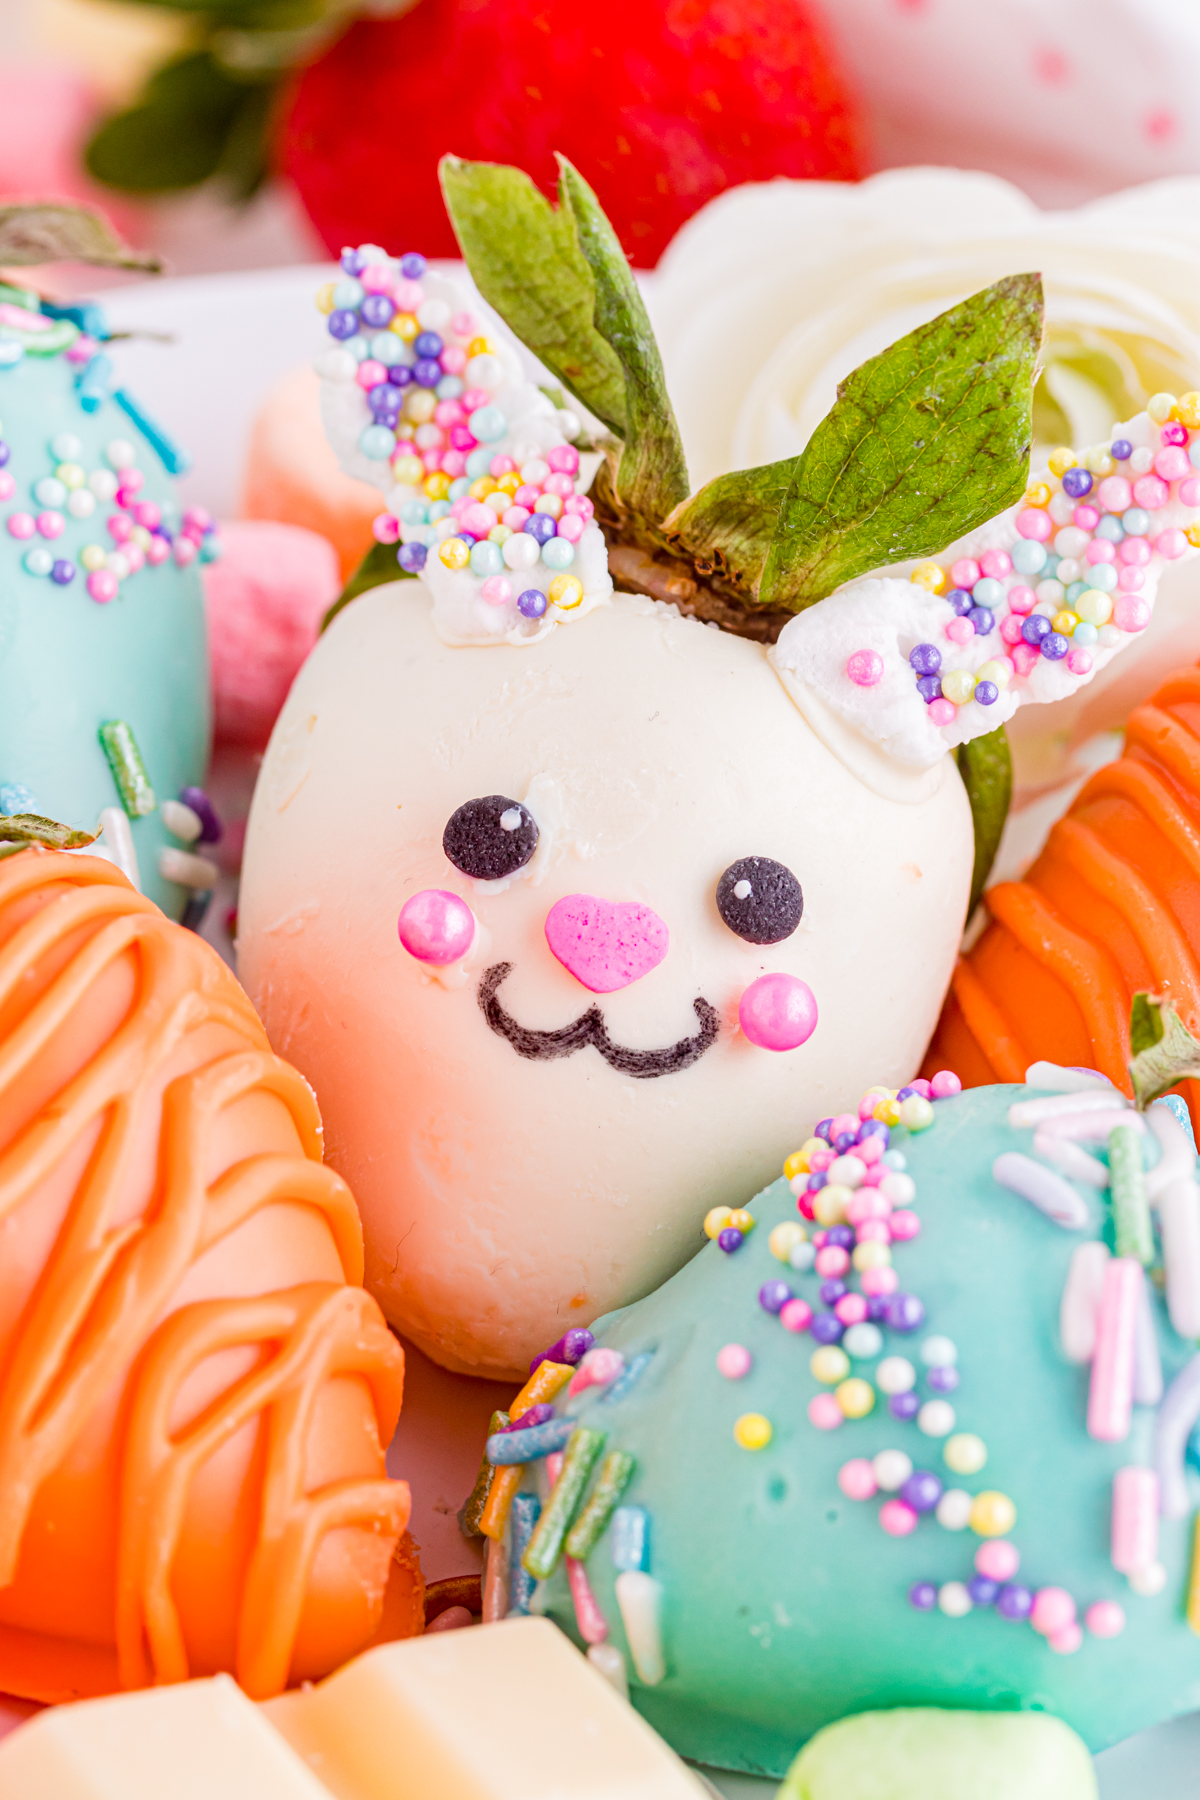
Strawberry Easter Bunny
- 1. Dip the strawberry in melted chocolate and allow the remaining chocolate to drip back into the bowl.
- 2. Place the strawberry on a parchment paper lined plate or baking sheet. Add sprinkles for the eyes, nose, and cheeks.
- 3. Once the chocolate has set add a mouth using an edible food marker.
- 4. Cut ears from a mini marshmallow.
- 5. Press the sticky side of the ears into sprinkles.
- 6. Attach ears using melted chocolate and allow strawberry to fully set.
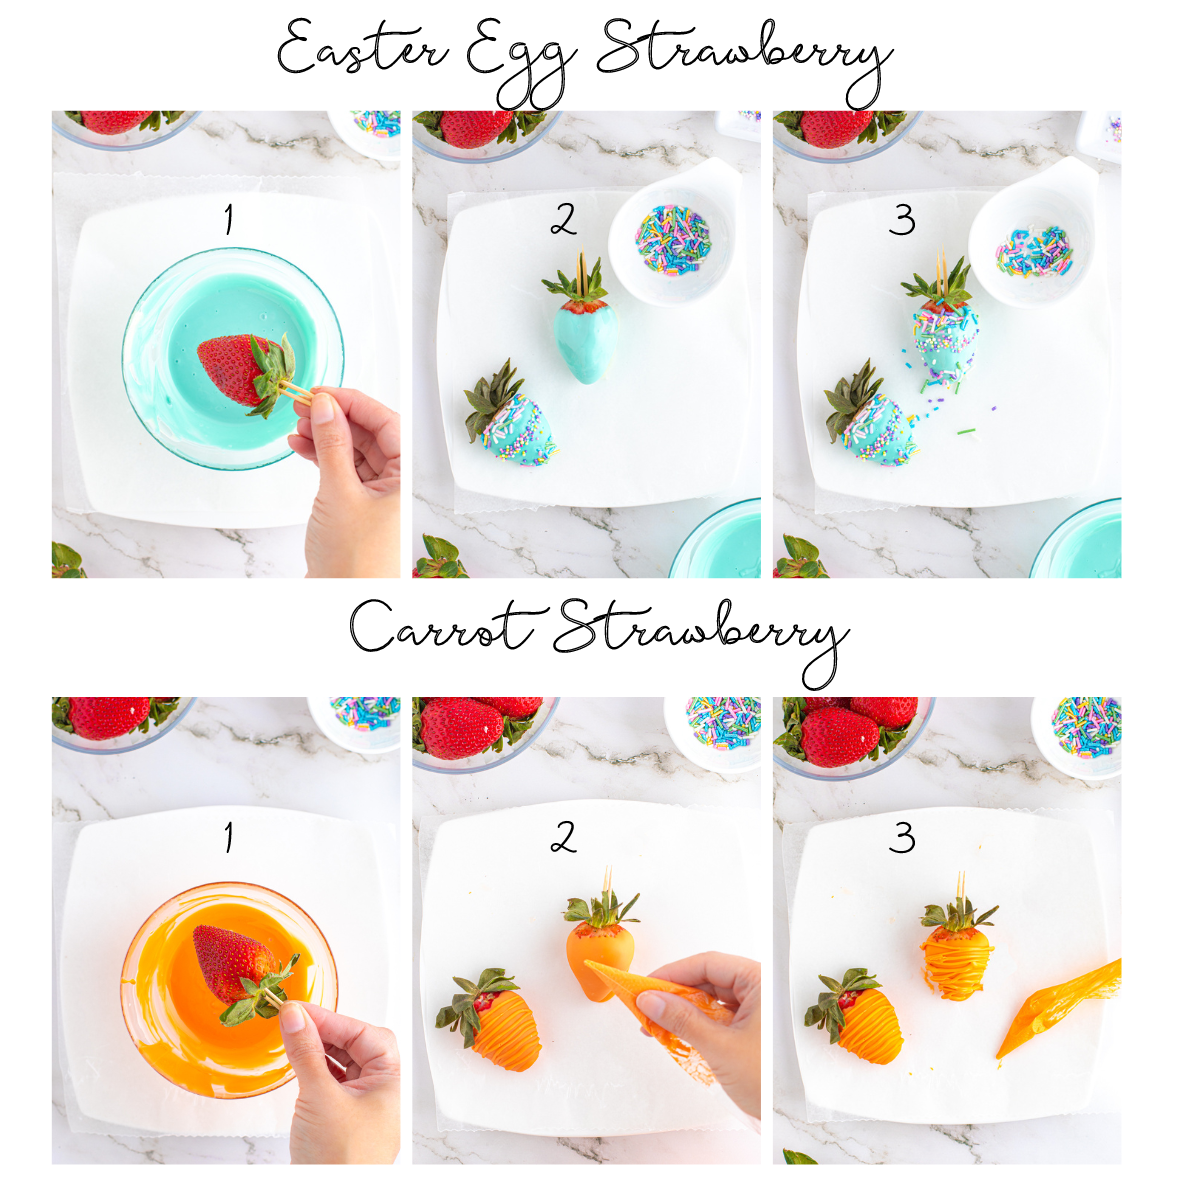
Strawberry Easter Eggs
- 1. Dip strawberry in blue-tinted melted chocolate.
- 2. Place on a parchment paper lined plate.
- 3. Garnish with sprinkles.
Strawberry Carrots
- 1. Dip strawberry in orange-tinted melted chocolate.
- 2. Place on a parchment paper lined plate.
- 3. Pipe chocolate lines to decorate like a carrot.

Frequently Asked Questions
After you have washed and thoroughly dried your strawberries insert a toothpick into the top of a strawberry and dip it in warm chocolate and allow it to set on a parchment lined baking sheet. Allow strawberries to set at room temperature.
Chocolate covered strawberries are best the day they are made. If absolutely necessary they can be made 2 days ahead and stored at room temperature covered loosely in wax paper or foil. They can also be stored in the refrigerator in a container lined with paper towels in a single layer and covered with wax paper.
Chocolate covered strawberries have better flavor if stored at room temperature. Refrigeration causes condensation and sweating which make them less appetizing. If at all possible consume them within a few hours of preparing them for the most delicious and decadent treat!
Expert Tips
- Wash and fully dry strawberries before attempting to decorate. Excess liquid can prevent the chocolate from setting properly.
- Be sure to stir chocolate when in between warming in the microwave to avoid scorching and burning.
- Candy melts can be used in place of white Belgian chocolate if you prefer. This will save time as no coloring would be required.
- If you are tinting your chocolate use only oil-based candy coloring otherwise you may not get uneven color and/or streaking.
- These strawberries will set up in about 10 minutes in the freezer but keep in mind that the stems will not be a bright green anymore. This is a good option if you are running short on time.
- These strawberries are best eaten the day they are made. If you do need to make them in advance store them in a container lined with paper towels in a single layer in the refrigerator for 2-3 days=. Do not cover them with a lid, this can lead to sweating and ruining your designs.
- Kids will love making these strawberries, especially adding the sprinkle details!
More Adorable Holiday Desserts
Try these White Chocolate Covered Strawberries for a more simple take on this delicious dessert! You can also round out your Easter dessert table with this Easter Fruit Salad !
Recipe

Easter Chocolate Covered Strawberries
Equipment
- Toothpicks for dipping strawberries
- small bowls for melting chocolate
- kitchen shears for cutting marshmallow ears
- parchment paper to line baking sheet
- baking sheet or plate for setting strawberries
Ingredients
- 12 strawberries washed and throughly dried
- 8 ounces Belgian white Chocolate tinted white for Easter bunny strawberries
- 8 ounces Belgian white chocolate tinted orange for carrot strawberries
- 8 ounces Belgian white chocolate tinted blue for Easter egg strawberries
- oil based candy color white, orange and blue
- assorted sprinkles
- mini marshmallows for bunny ears
- edible food marker
Instructions
Easter Bunny Strawberry
- Melt 8 ounces of white chocolate in a microwave-safe bowl. Melt in 20-second increments, stirring in between until melted and smooth. Add a few drops of white candy color for a bright white if you wish.
- Line a baking sheet or plate with parchment paper
- Insert a toothpick into the top of a strawberry and dip into the white chocolate allowing the excess to drip back into the bowl.
- Place the strawberry on the prepared baking sheet .While the chocolate is still wet, carefully add a heart-shaped sprinkle for the nose.
- Next, add 2 round black sprinkles for the eyes ( for a fun detail use a toothpick dipped in a small amount of white chocolate, add a little white sparkle to each eye).
- Add two small pink pearl sprinkles to form cheeks. allow to fully set or place in the refrigerator to set quickly.
- Once set, draw the mouth with an edible black food marker, using light pressure to avoid creating a hole in the chocolate.
- Using a pair of kitchen shears or a sharp knife make a slit in the middle of a mini marshmallow being careful not to cut all the way through.
- Pull open the marshmallow to create an ear. Press the sticky side down into a small dish of nonpareils. Repeat with another marshmallow for the second ear.
- Using melted chocolate and a toothpick, attach the ears to the top of the bunny's head. Allow to fully set (popping it back in the fridge for 10 minutes will set it faster than air drying).
Easter Egg Strawberry
- Melt 8 ounces of white chocolate in a microwave-safe bowl. Melt in 20-second increments, stirring in between until melted and smooth. Add a few drops of blue candy color until you reach your desired shade.
- Insert a toothpick in the strawberry and dip it into the blue chocolate allowing the excess to drip back into the bowl. Transfer it to the parchment paper lined baking sheet.
- Garnish with sprinkles of your choice in a line pattern or any pattern you wish!Allow to fully set.
Carrot Strawberry
- Melt 8 ounces of white chocolate in a microwave-safe bowl. Melt in 20-second increments, stirring in between until melted and smooth. Add a few drops of orange candy color until you reach your desired shade.
- Insert a toothpick in the strawberry and dip it into the orange chocolate allowing the excess to drip back into the bowl. Transfer it to the parchment paper lined baking sheet and allow it to set.
- Add about a tablespoon of the melted orange chocolate to either a piping bag or a zip lock bag with the corner cut out. Drizzle some lines on the carrot for texture.Allow to fully set.
Notes
expert tips
- Wash and fully dry strawberries before attempting to decorate. Excess liquid can prevent the chocolate from setting properly.
- Be sure to stir chocolate when in between warming in the microwave to avoid scorching and burning.
- Candy melts can be used in place of white Belgian chocolate if you prefer. This will save time as no coloring would be required.
- If you are tinting your chocolate use only oil-based candy coloring otherwise you may not get uneven color and/or streaking.
- These strawberries will set up in about 10 minutes in the freezer but keep in mind that the stems will not be a bright green anymore. This is a good option if you are running short on time.
- These strawberries are best eaten the day they are made. If you do need to make them in advance store them in a container lined with paper towels in a single layer in the refrigerator for 2-3 days=. Do not cover them with a lid, this can lead to sweating and ruining your designs.
- Kids will love making these strawberries, especially adding the sprinkle details!


Leave a Reply